Traefik Load Balancer for ECS services
This is a tutorial on how to deploy a Traefik Load Balancer in AWS to create hosts (FQDN) for development applications launched in ECS based on application name and tags.
The resources for this tutorial are also posted on GitHub and contain all you need to have this stack up and running.
What is Traefik?
Træfik (pronounced like traffic) is a modern HTTP reverse proxy and load balancer developed initially by ContainoUs, which helps you deploy microservices with ease. It supports several backends (Docker, Swarm mode, Kubernetes, Marathon, Consul, Etcd, Rancher, Amazon ECS, and a lot more) to manage its configuration automatically and dynamically.
What this means is that you don't need to rely on hard-to-manage config files nor on some orchestration mechanism for updating them (using Consul for instance), as this load balancer automatically reads and updates its configuration on its own based on the current status of the backend that you're using.
How you ask? Well, if you've ever used Prometheus and have played at least a bit with its own config file, you've noticed that it uses a scraping mechanism to test the targets at a specific interval, also known as a polling mechanism. That's what's behind Traefik's logic as well.
Comparison vs NGiNX
"Another load balancer and reverse proxy mechanism? But we have nginx and haproxy for that?!" - you might ask.
Well, first of all, NGiNX is NOT a load balancer :) It's just a reverse proxy as a web server that *can* also do that. Second of all, anyone that has actually used NGiNX in production to manage more than just 2 microservices, will agree that creating a workaround with Consul that tests the configuration, reloads it gracefully and makes sure that it can respond to requests even when an upstream is a FQDN and not an IP (which is the case for load balancers in AWS), is really a pain in the a$$.
That's actually the beauty that Traefik brings into play. Besides the fact that it is proven to be 85% faster than NGiNX, it *never* changes its PID (making it extremely suitable to be ran in a container) and handles extremely gracefully hot reloading when it is required.
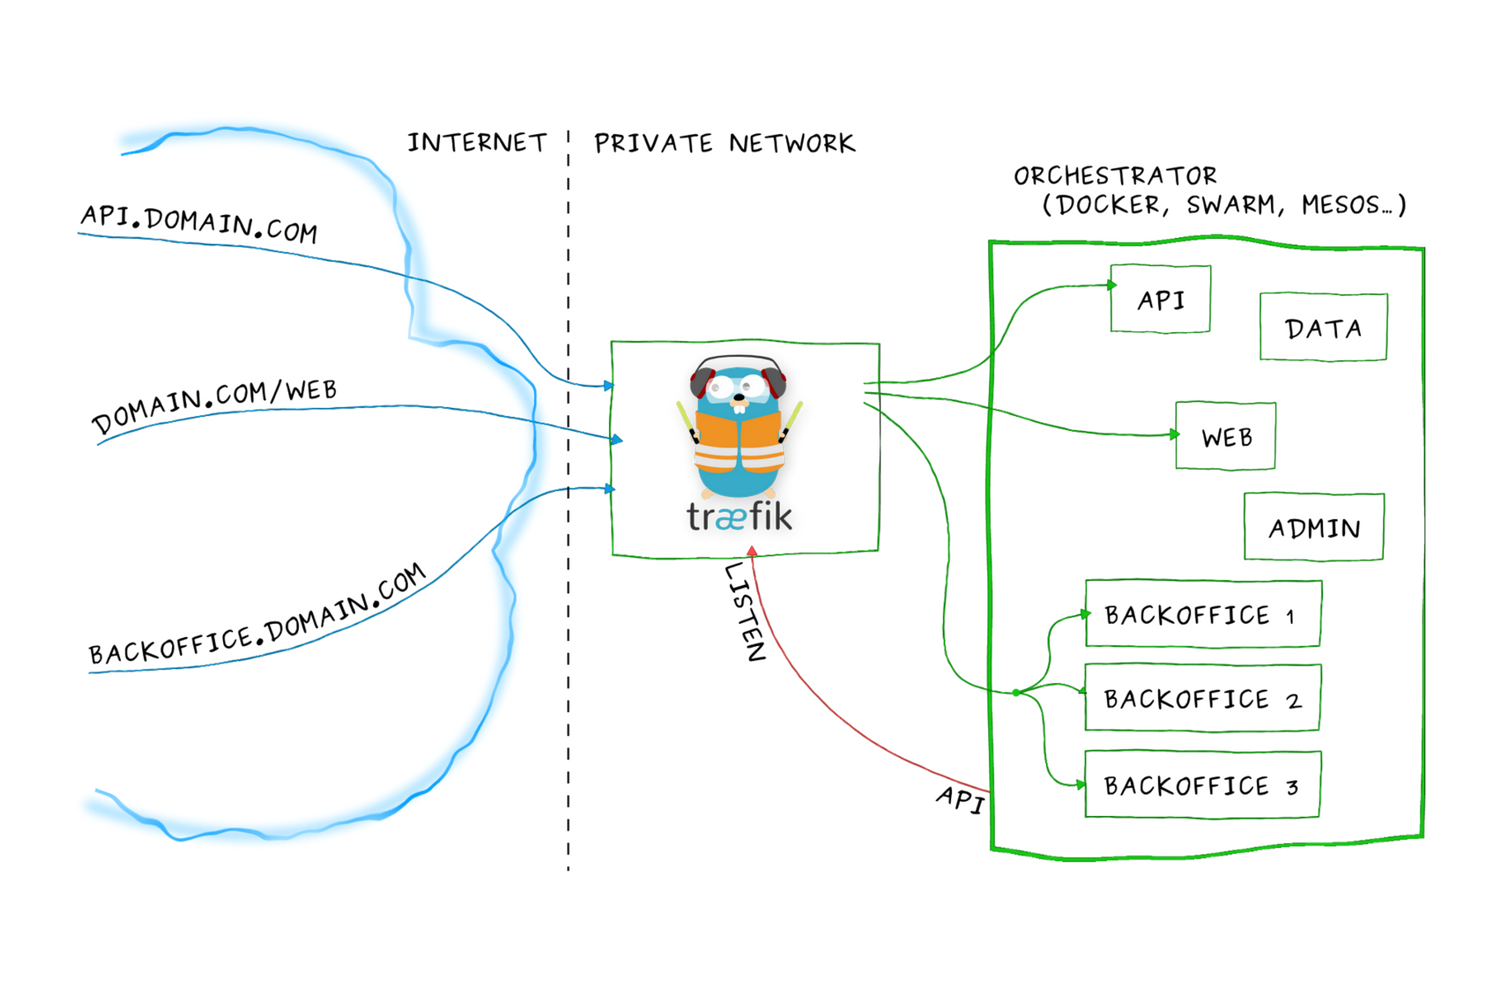
More than that, it also handles extremely gracefully cases in which microservices are published as different variants of the same URL (http://example.com/ms1 and http://example.com/ms2), and it's also suitable for cases in which the microservices are published under different host variants (http://ms1-example.com and http://ms2-example.com), which is actually the topic of this tutorial!
And if all of this didn't yet convince you to take Traefik into consideration when building the infrastructure for your microservices network, then keep in mind that out-of-the-box support is offered using Let's Encrypt for SSL termination, meaning that not only that the initial config for it is low-to-none, but there's also no need for maintenance in changing/refreshing your certificates.
For a quick demo on how powerful Traefik actually is and how simple it is to set up, check out Emile Vauge (Founder and CEO of containo.us - creator of traefik.io) giving a talk at GopherCon 2017 on the basis of Traefik in less than 10 minutes.
Building the Traefik container
I don't know about you guys, but I'm a big fan of the alpine containers and using default and tagged vendor pre-vetted images, so my Dockerfile pretty much looks like this:
The traefik_ecs.toml file contains the standard ECS backend definition:
And the docker-entrypoint.sh is just a shell script to replace the variables in the TOML file using environment variables:
Using these files, all one has to do is just build the container and send it to ECR:
Launching the Traefik container
- Login to the AWS console and browse to the CloudFormation section
- Select the cloudformation-template-traefik.yaml file
- Before clicking "Create", make sure that you scroll down and tick the “I acknowledge that AWS CloudFormation might create IAM resources” checkbox
- ...drink coffee...
- Go to the URL in the output section for the environment that you want to access
Launching a test application in a container
For the purpose of simplicity, we're going to launch 2 versions of the same container with different tags so that we demonstrate the fact that 2 URLs will be created using the format:
- Login to the AWS console and browse to the CloudFormation section
- Select the cloudformation-template-service.yaml file
- Before clicking "Create", make sure that you scroll down and tick the “I acknowledge that AWS CloudFormation might create IAM resources” checkbox
- ...drink coffee...
- Go to the URL in the output section for the environment that you want to access
Checking status in Traefik
After we've done all this, it's time to see if the services that we launched in the cluster to be monitored have been loaded in Traefik.
To do that, we just browse to the Traefik ECS service, click on any of the running tasks and open the link which exposes the port 8080. If everything went well, then something like this should appear:
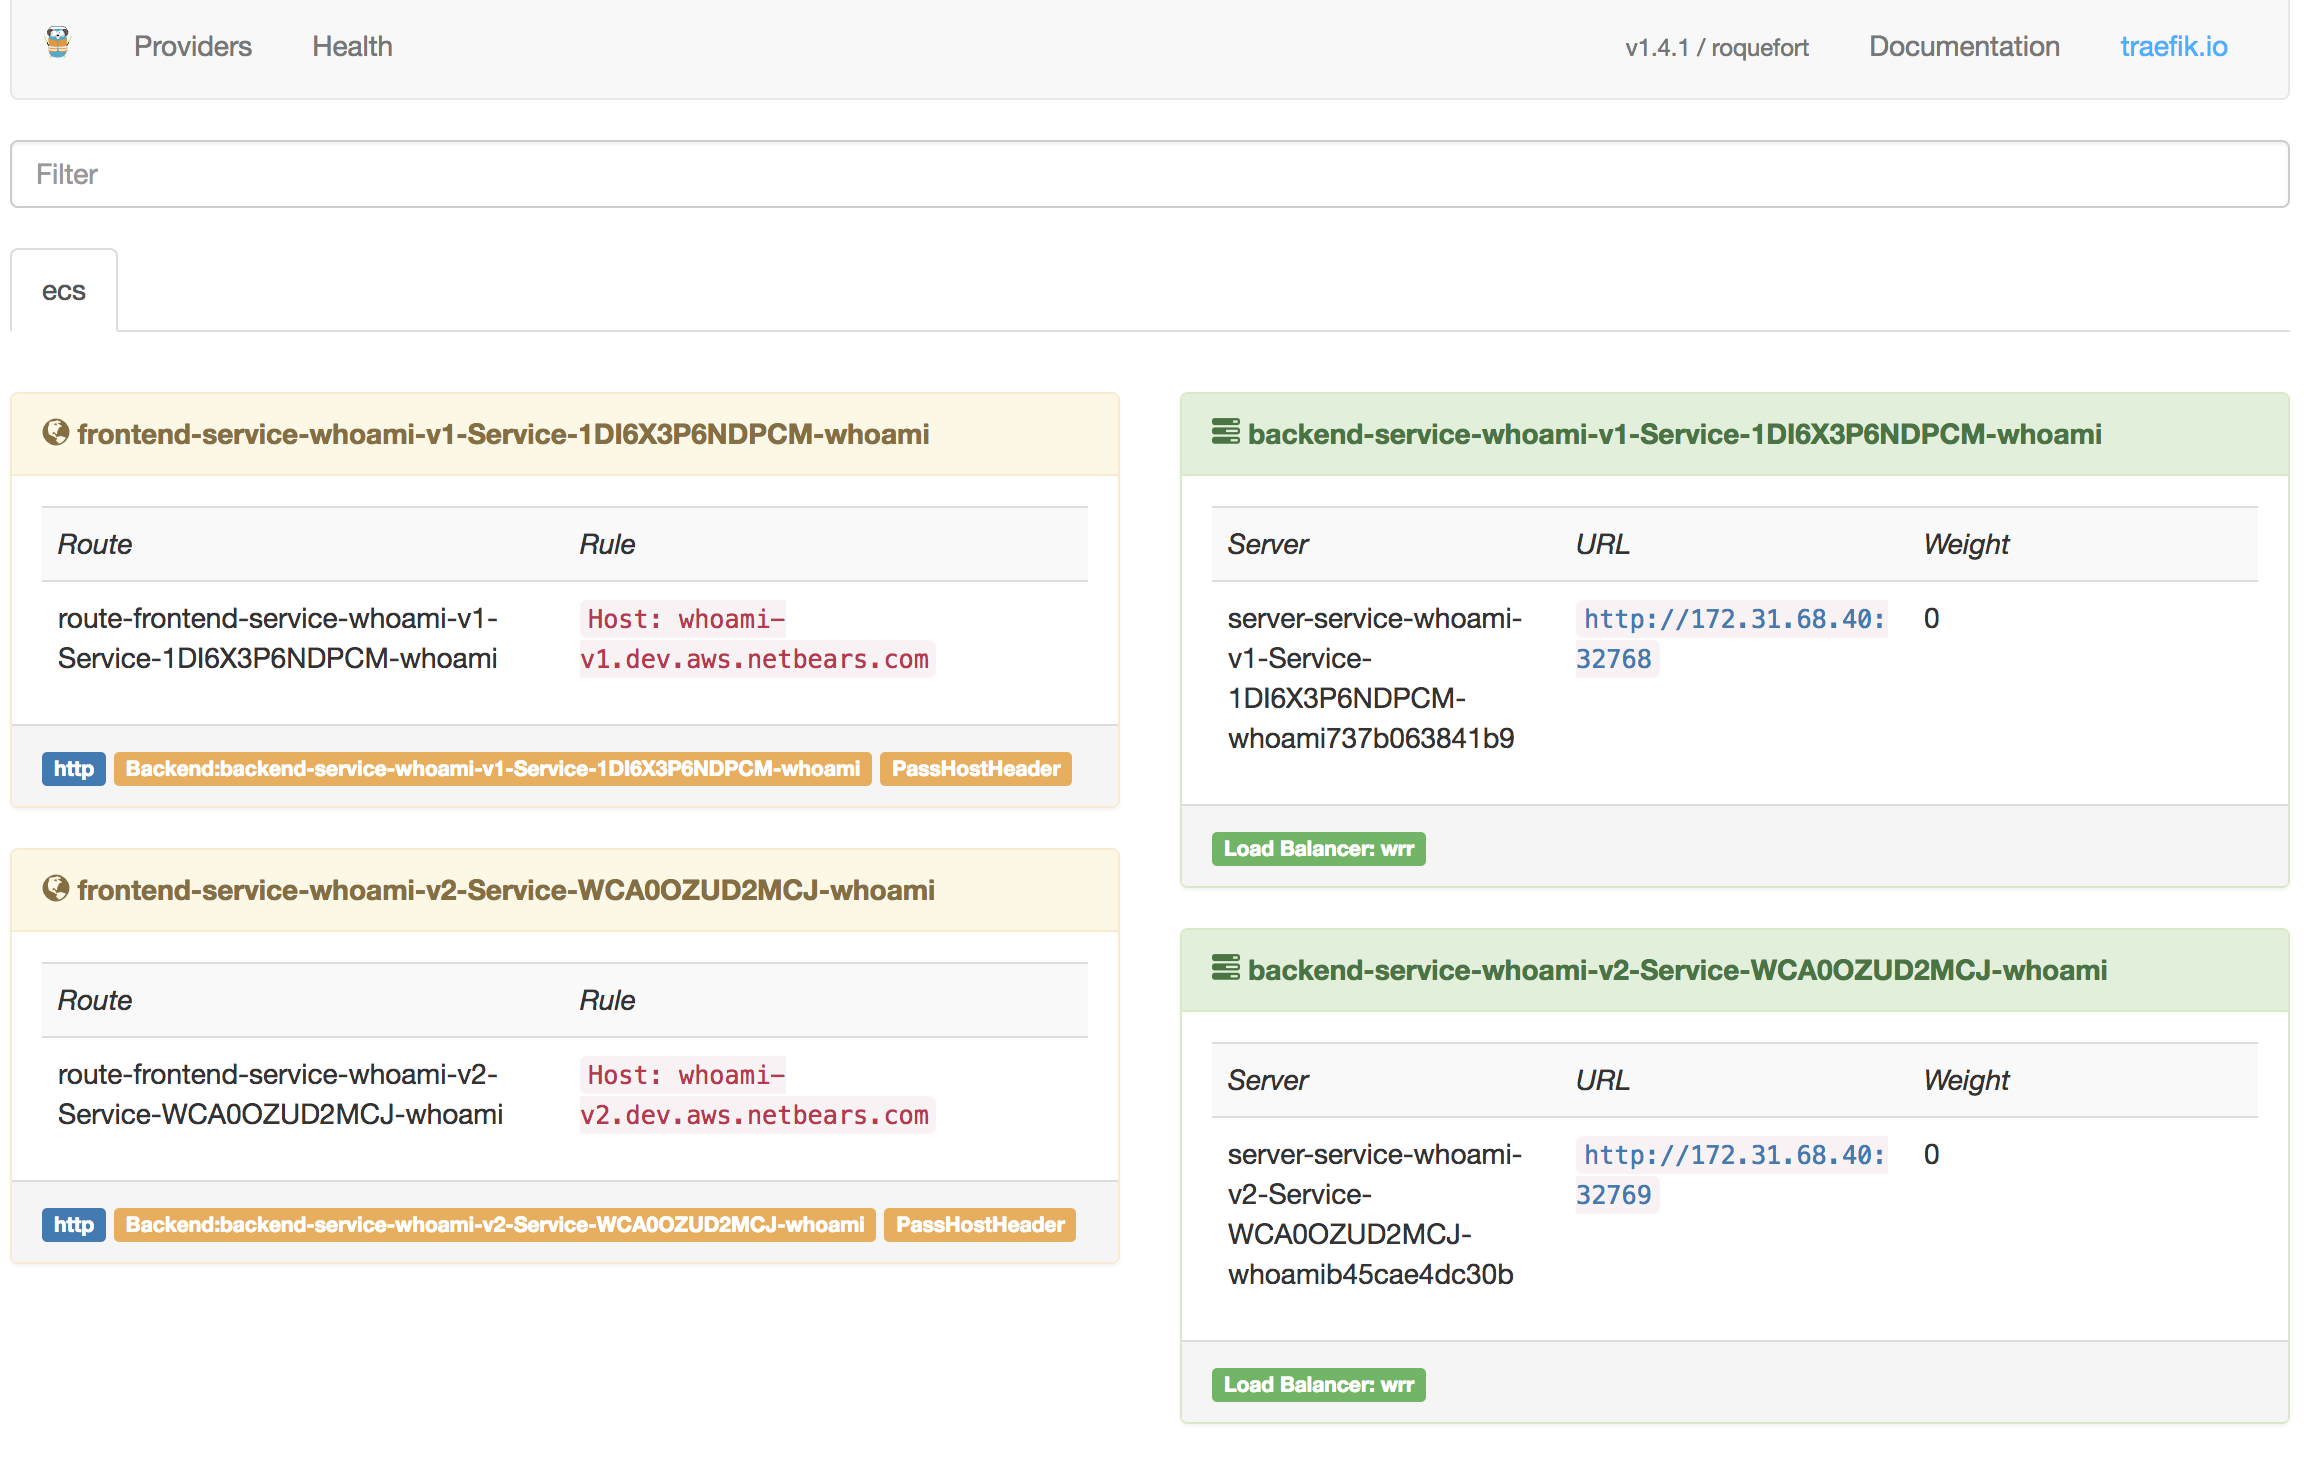
As you can see, we currently have the same service, exposes twice, with 2 different URLs, based on the tag that was supplied:
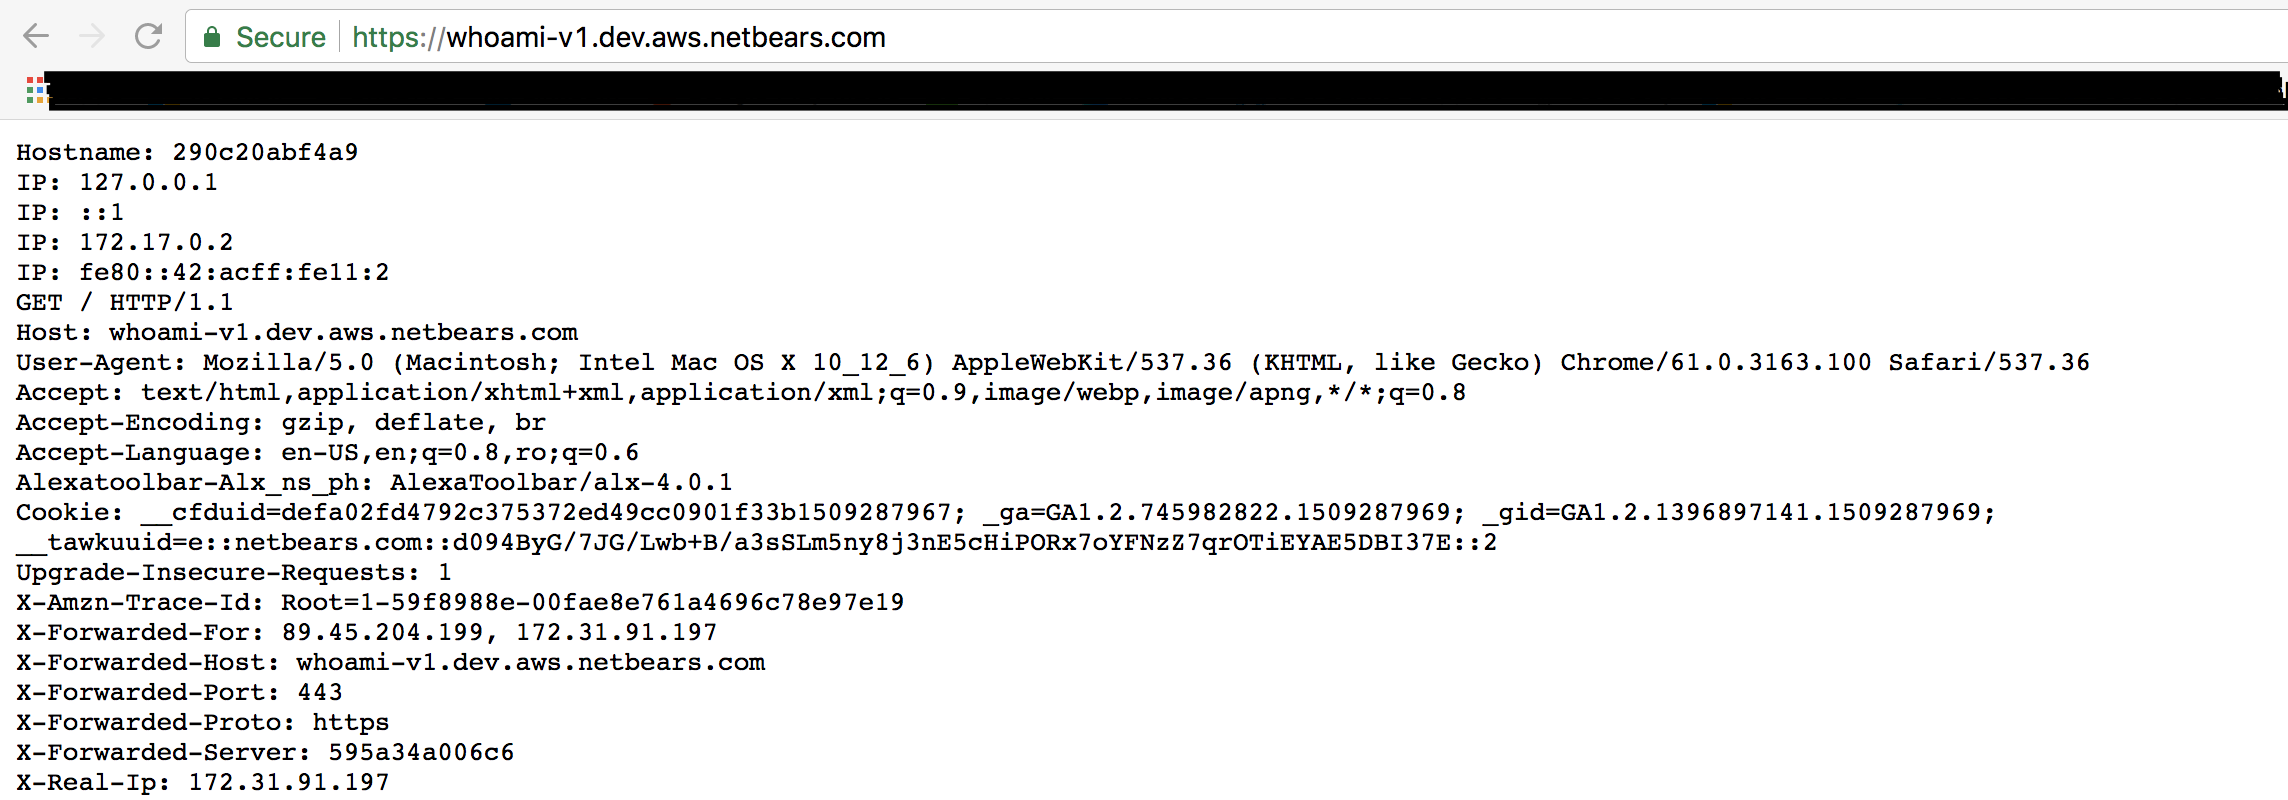
Accessing your containers
Well, I'm assuming you've already guessed that this is the easiest part :-).
All you have to do is browse to that URL. If everything went fine, then you'll see your application.
For instance, for this specific tutorial, I've purposely included a custom script that displays all cookies and headers of your request when accessing it via Traefik:
Picture sources
Final notes
Need help implementing this?
Feel free to contact us using this form or via email at