Run a cross cloud Kubernetes cluster of clusters
This is a tutorial on how to unite the benefits from what all cloud providers have to offer and create a global Kubernetes cluster that scales worldwide.
The resources for this tutorial are also posted on GitHub and contain all you need to have this stack up and running.
What is Kubernetes?
Kubernetes is an open-source system for automating deployment, scaling, and management of containerized applications.
Why would I want to run my applications on top of Kubernetes?
- Scale Globally -> Because it uses the same design patterns that Google does to run its billion containers a week, you'll be able to increase the load as soon as you need it, without needing any help from your operations team.
- Highly Portable -> Because it is an open-source platform, it has been designed from the ground up to properly interact with all sorts of infrastructures, be them on-premises, hybrid or public cloud.
- Self Healing -> Due to its advanced scheduling system, it automatically detects the best hosts/clusters/regions/clouds to place your tasks and make sure they are allways running.
What is Kubernetes Federation?
Kubernetes Federation has been developed due to the team's continuous pursuit to efficiently deploy and manage applications across the globe.
With this in mind, and to simplify things as much as possible without losing functionality, the team released Kubernetes version 1.3 in July 2016 which was the first to support this type of concept. Granted, it was still in beta back then and some of the features are still not available in the latest stable version (v1.8), but huge efforts are still put into making Kubernetes Federation a production-ready tool.
Why would I want to use Federation anyway?
- High Availability -> Achieve true high availability by deploying multiple clusters into different AZs/Regions/Cloud Providers instead of simply increasing the number of instances of your single cluster.
- Geographic Coverage -> One of the huge advantages of using Federation, and the one that we're going to tackle in this tutorial too, is reducing latency for end-users by spreading the load of your application into different endpoints across the globe.
- Resource Utilization -> Because Kubernetes is by-default cloud agnostic, one can deploy different clusters in different public clouds to benefit from any specific/unique solution that one cloud provider might have to offer and another cannot.
The problem
In this talk, we're going to try to solve the following problem:
Company Description
FinSolutions is a company running in the FinTech sector which currently handles a few million customers in the United States and wants to expand its services to Western Europe and Southeast Asia.
Proposed Architecture
Because the company values its customers' security information and private data while also following all existing security standards and concerns at a global level, such as the Data Protection Act, it has decided that it will deploy 2 more versions of its application into 2 additional regions that will run independent from one-to-another but can still be managed using one single secure endpoint.
The applications must all follow of course the true highly available model and allow the company to promise its end-users that it will deliver a 99,99% availability of its systems. They will be deployed initially into different cloud providers in order to test the features, availability and services that each cloud can offer before a final decision is made.
The Plan
We're going to deploy 2 clusters (besides the pre-existing one), into 2 different regions and launch a full end-to-end application while testing all services that Kubernetes Federation can currently support.
The solution
Provision Kubernetes clusters
StackPoint is a web-based platform that lets you manage a global Control Plane of managed Kubernetes clusters using only one endpoint.
It allows the creation of organizations and workspaces while offering specific permissions to specific users within your organization.
The company aims to offer support across all major cloud providers while benefiting from "normal" features that one would expect, such as:
- Easy Upgrade -> Upgrade your Kubernetes cluster with one click of a button.
- Dashboard Access -> Allow privileged users to access dashboards of the clusters that they are allowed to manage without needing to install any other tool (such as kubectl).
- Community -> A community of mind-liked Kubernetes enthusiasts and a place to share your thoughts, ideas and problems regarding the Kubernetes Federation process.

Now that we have our clusters up and running, let's download the kubeconfig files and configure our credentials. We're going to need to install kubectl and load-kubeconfig first, which are 2 applications that will help us send API requests using the CLI from our laptop.
The reason why we download the credentials from google using gcloud, whilst setting up that configuration, is because we specifically need to use the certificate authentication mechanism, instead of the default one provided by Google.
Set up the DNS solution
In order for the federation to function properly, a highly-available global DNS solution must pre-exist so that the Kubernetes clusters can easily talk with each-other.
For this tutorial, we're going to use Amazon's Route 53 service to define it. After creating the hosted zone, we're going to make sure that our registrar/upper-level domain properly delegates the control of this zone to Amazon's Name Servers.
Test Kubernetes connectivity
Let's have a look at how our clusters look and the diffent labels that have been applied by default.
In order to properly deploy all resources across all clusters and to make sure that they are spread evenly across all cloud providers, we're going to create a default namespace in which to deploy them.
Deploy the databases
In order to ensure high availability, we're going to deploy a master-to-master MySQL cluster using PerconaDB in each cloud.
For that, we're going to make use of the affinity in order to launch 3 database systems, one on each cloud.
Surprise :-). This doesn't work. Affinity rules are not yet supported using the federation context.
This means that we're going to have to deploy them the "old" way, manually on each cluster. To ensure though that the database entities (master1 and master2) will be deployed though separately, on different instances, we're going to use the PodAntiAffinity rules by specifying the hostname as a topology key.
Deploy the web services
For the purpose of this tutorial, and to simplify things, we're going to use the standard wordpress image.
Noticeably, even though we didn't specify any affinity or antiaffinity rules, the pods have been scheduled balanced across all clusters regardless.
Set up roles and permissions
In order to prepare the deployment of our ingress, we need to first allow it to capture details about the running services and pods + read secrets and config maps.
Because these roles are cluster-binding, it's kind of implicit that they won't work using the federation context.
Secret management
Now that our ingress has all the necessary permissions, let's move on to uploading the SSL cert and key in the form of secrets across all clusters.
This time though, we're in luck. Secret management goes accross all clusters.
Traefik configuration
Before we launch the Traefik ingress, we need to first schedule the Traefik pods which will serve the ingress.
For that, we're going to deploy a confimap which contains a rule to redirect HTTP to HTTPS and the actual Traefik containers and services.
Prove GeoLocation
I've also included in this tutorial a small application which parses the headers thrown by the LoadBalancer. We're going to use this to determine which cloud was used to serve our request. Let's deploy this now too.
Launch the Ingress
Time to launch our Ingress now. It is a simple config which routes the request based on the Host.
Infrastructure review
Now, if everyting went fine, we should have all our services, pods, configs and secrets evenly distributed across all clusters. Let's see how this looks:
SHOCKER: Only 1 Ingress ?!
As some of you might have already expected, the Ingress deployed only to one cloud.
Why is that?
Time to look at the Traefik-Status service (in AWS) to see how it looks.
It appears that it only connects to the services that are deployed on that Cloud itself, and not on the others.
Because we've deployed not as much pods in the deployment as we would need, we're going to see that they're not correctly balanced across all clouds.
Let's delete our Ingress now and launch one in each cloud instead and define our endpoints.
Play around with scaling
Let's play around with the scaling options a bit to see how they perform.
As you guys can see, the federation cluster will send the pods/deployments however it sees fit.
If we want to control this and set an explicit amount of pods per cluster, we're going to have to keep in mind that they are also being maintained by the federation context itself.
This means that well, we can't scale it per total to contain more pods than the maximum limit set by the federation context itself, because the federation will automatically scale them down :-).
Play time is over
Now it's time to actually route our requests.
But first, let's create a few healthchecks.
PS: Although we're also using the IP method for AWS too, it is definitely not recommended by AWS because they usually rotate their IPs and they don't give notice about that <> Routing to ELB.
 .
.
Now that we have our HealthChecks in place, we're going to set up 2 DNS records using Geographic routing, as so:
- Azure -> All European requests.
- AWS -> All NorthAmerica requests.
- Google -> All Asia requests.
- Default <> AWS.
Test our config
Awesome. Everything looks fine now. Let's test our systems.
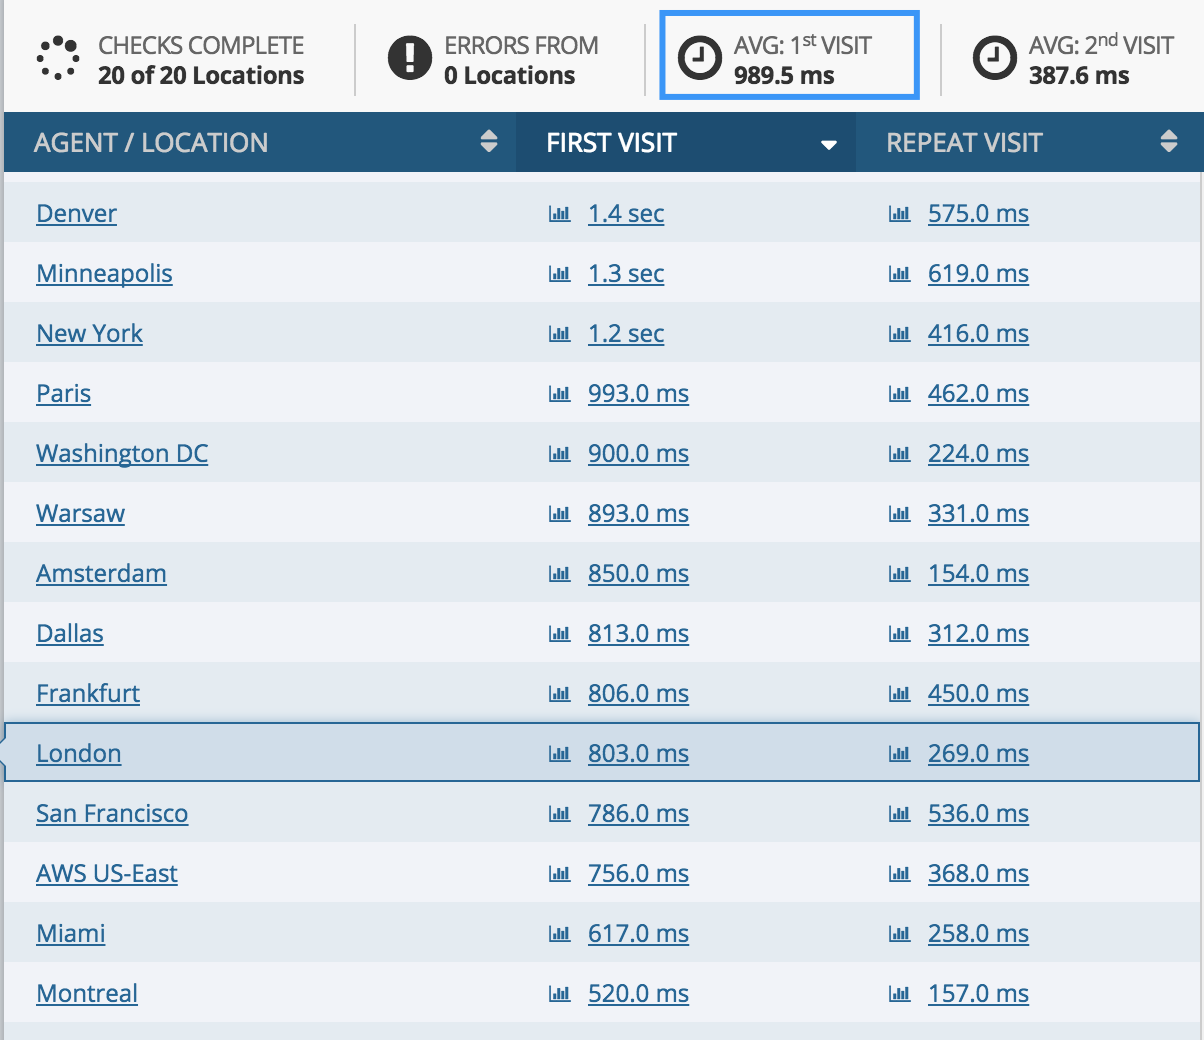
Test the latency
Feast your eyes on the ~1 sec latency across the globe that your application now delivers using dotcom-monitor :-).
 .
.
Final notes
Need help implementing this?
Feel free to contact us using this form or via email at